⚔
★
⚓
✦
✦
⚜
♜
⚝
✦
✦
⚔
⚛
⚛
⚛
★
⚛
✦
✧
⚛
♜
⚓
⚡
✦
⚡
✧
⚡
⚓
⚔
⚔
⚜
⚝
⚔
⚓
⚓
✧
⚔
✦
♜
✧
★
✧
⚝
⚡
✦
⚔
★
★
⚝
⚜
⚛
⚓
★
✦
✦
✧
⚛
⚓
⚡
✦
⚔
♜
⚡
★
⚛
✧
⚡
⚛
✦
⚜
★
⚜
⚝
⚜
⚔
✧
★
⚓
✦
✧
✧
⚔
✧
⚛
⚔
⚡
⚛
⚓
⚓
⚝
★
♜
✧
⚛
✦
♜
♜
⚔
✦
✦
♜
⚝
⚜
✦
⚔
⚝
⚜
✧
⚜
♜
♜
✦
⚓
⚜
⚜
✧
✧
⚛
♜
⚔
★
⚜
♜
⚜
⚝
⚛
★
⚛
✧
⚡
⚡
✦
⚓
⚓
⚝
★
✦
⚜
✧
⚝
⚝
⚛
⚛
⚓
★
⚔
⚔
⚛
⚔
⚡
⚔
⚛
⚔
⚔
⚛
✧
⚜
⚛
⚡
⚔
⚡
⚡
⚡
♜
⚓
⚜
✧
✦
⚛
♜
⚜
⚔
⚔
✦
⚔
⚝
✦
⚝
⚜
★
✦
★
⚛
⚜
✧
♜
⚛
✧
⚜
⚡
⚜
♜
⚔
⚡
⚛
⚡
⚔
✧
★
✦
⚜
⚝
⚡
⚛
⚜
⚝
⚓
⚡
⚡
✧
✧
⚓
✧
⚓
⚝
⚝
⚔
✦
⚔
⚔
⚔
✦
⚓
⚡
⚝
✦
★
⚜
★
✦
⚝
⚜
♜
⚛
⚜
⚓
⚔
⚜
★
⚛
⚔
✧
★
⚡
⚔
⚛
★
⚓
⚔
✦
★
⚡
⚜
⚝
⚓
⚝
⚔
⚓
⚜
⚛
⚛
★
⚓
⚔
⚡
⚓
♜
⚜
✦
★
⚛
✦
⚜
✦
⚛
★
⚜
⚡
⚓
⚔
⚜
⚓
⚡
✧
⚝
⚜
⚜
⚛
⚓
★
⚔
⚔
✦
⚡
⚝
⚓
⚛
⚔
⚔
⚜
⚔
♜
⚔
⚓
⚜
★
⚛
♜
⚡
✧
⚝
⚝
✦
★
⚓
⚡
⚜
✦
✦
✦
⚜
⚜
♜
★
★
⚝
✦
♜
✦
✦
★
⚜
⚡
⚡
♜
✧
⚡
✧
✧
✦
★
★
★
⚜
✧
⚔
⚡
⚔
⚝
✧
⚜
⚛
⚡
⚛
⚔
⚝
⚝
⚜
♜
⚝
⚛
♜
✧
✦
⚔
⚜
⚡
★
⚔
⚡
♜
⚔
⚝
✧
★
★
✦
★
⚔
⚓
⚛
★
★
⚜
★
♜
⚡
★
⚛
♜
⚝
⚔
⚡
⚔
⚛
✧
⚛
✧
⚓
⚓
⚛
✧
♜
♜
⚔
Back to Room Map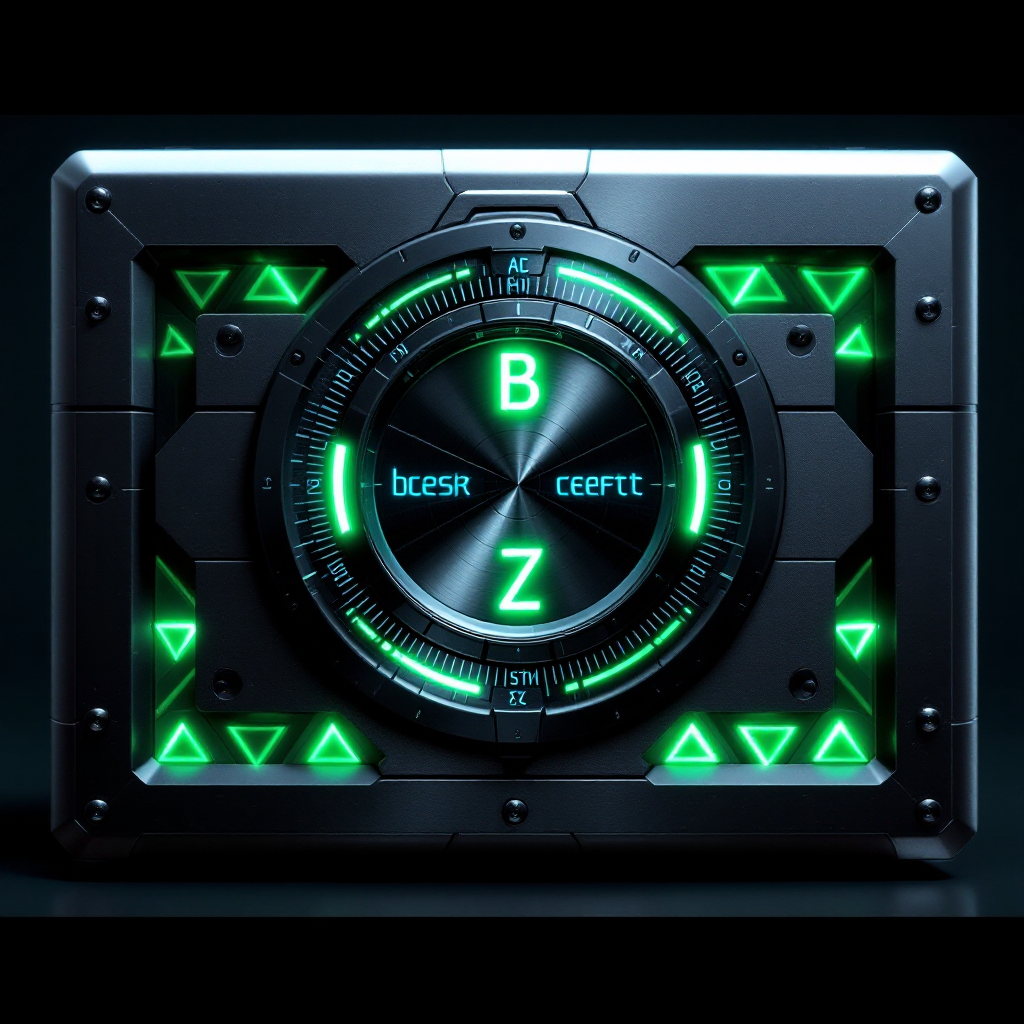
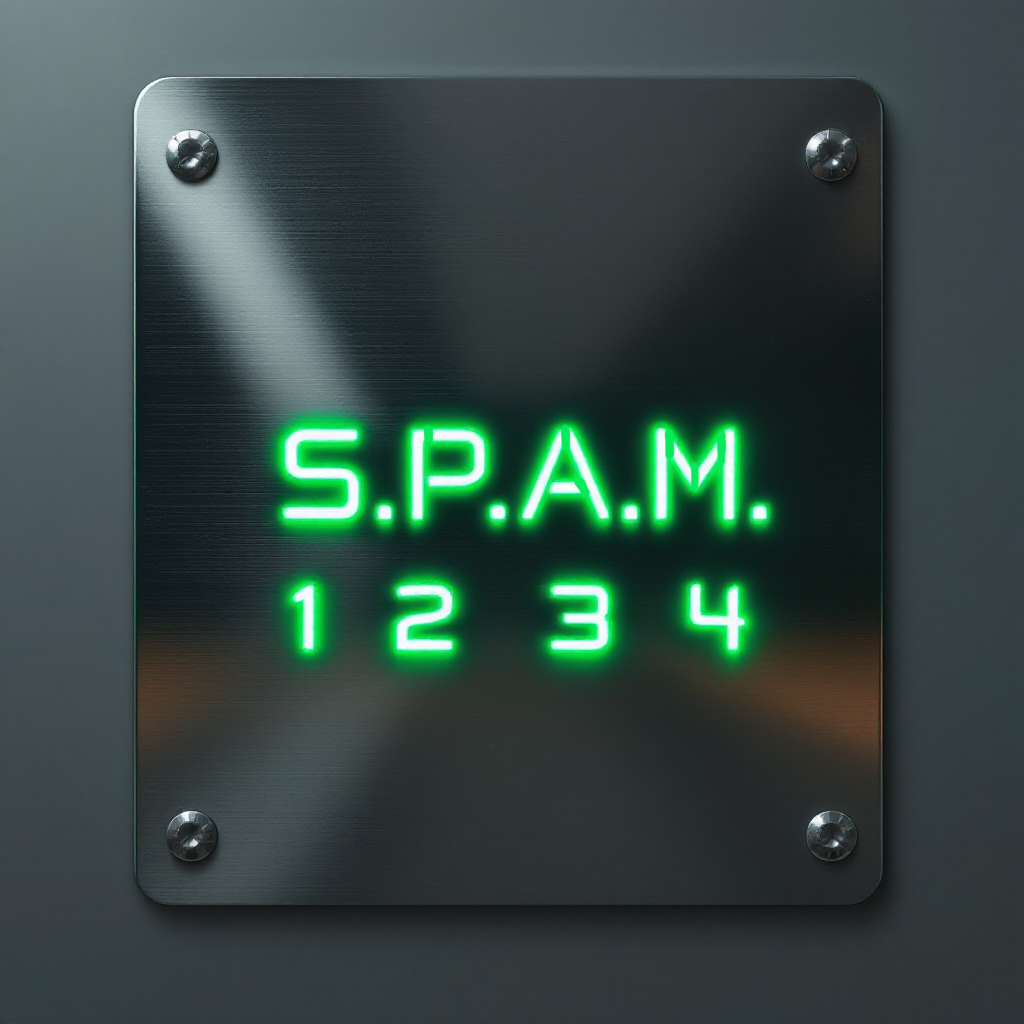
Lockbox
This high-tech lock box is secured by a combination lock. Each of the four dials features the letters A to Z around their circumference. The box itself is adorned with designs predominantly featuring triangles that emit a soft glow. On the underside of the case, there is a metal panel inscribed with mysterious symbols. Beneath these symbols are the letters S, P, A, and M, followed by the numbers 1, 2, 3, and 4.